Have you ever had a brilliant idea for building an online course but weren’t sure how to bring it to life?
If you’re passionate about a subject, skilled in it, and know it can benefit others, you’re ready to become a successful course creator.
With the rising demand for fresh, quality content, creating and selling a course is a fantastic way to meet this need and earn revenue. By imparting your knowledge, you can become an authority, create a community, and reach a larger audience.
By turning your knowledge into an online course, you’re not just imparting valuable skills; you’re also making an income-producing product that makes a real impact.
This guide will walk you through the process of create an online course, from choosing the right topic to setting up your course website.
Now, let us get started with the 12 steps for making an online course!
Why create an online course?
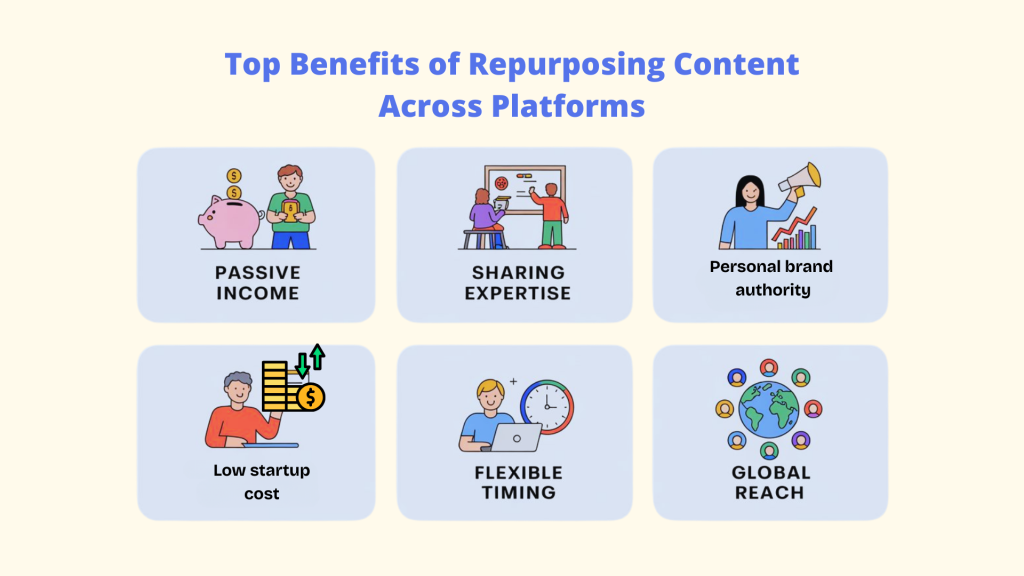
Before jumping into the create-an-online-course step-by-step process, let’s first consider why creating an online course is a smart move:
- Earn passive income: Once your course is up, it can bring in money with little ongoing effort.
- Share your expertise: Help others grow by teaching what you know.
- Build your brand: Position yourself as an expert in your industry.
- Work on your own time: Create and manage your course whenever it suits you.
- Expand your reach: Teach students from all corners of the globe.
Now, let’s break it down into simple, manageable steps.
Now, let’s learn how to create an online course step by step
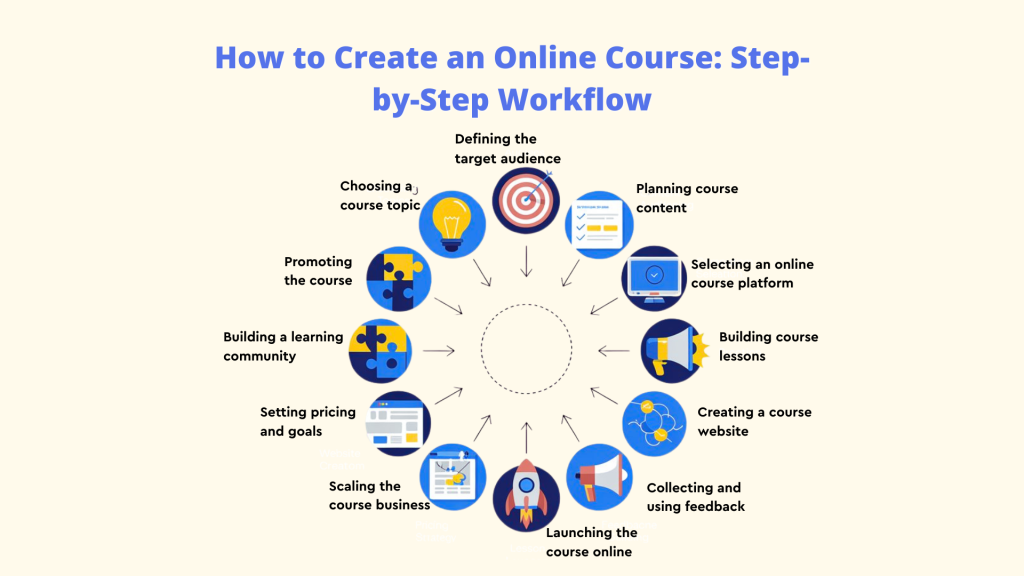
Step 1: Choose a topic for your course.
The first step is to identify a topic that you are passionate about and have expertise in. Here’s how to nail it:
A. Identify your expertise or passion: What do you know well? What do you enjoy doing? By figuring out what you are passionate about or where you excel. This ensures that your course content is both engaging and useful.
B. Research market demand: Use tools like Google Trends, Amazon Bestsellers, and Udemy to see what people are interested in. Look for gaps in the current data where you can add something fresh to make it complete.
C. Target a profitable niche: Discover the secret spot between your expertise and market demand. Concentrate on a niche within your area of interest with high demand and little competition. This increases the possibility that your course will succeed.
D. Verify your concept: For proof of your idea, survey or poll those who are your audience, and look into similar courses offered by competitors. Study and feedback can help you polish your topic and figure out whether there is interest.
Step 2. Determine who your audience is
To build a course that truly links with your audience, you need to understand who they are. Identifying your target market can be done as follows:
A. Create a student profile: Who is your ideal learner? Consider their age, background, and skill level. With these, you can build a detailed profile of your ideal student, including demographics, interests, and learning preferences. This will guide your course content and marketing efforts.
B. Identify their needs and goals: What challenges are they facing? What do they hope to achieve? Identify the problems your audience is facing and what they hope to achieve through your course. Ensure your content speaks directly to these needs.
C. Customize your content: Make sure your course meets their needs and helps them reach their goals.
With CourseFunnels, you can easily set up course giveaways using your content or PLR materials. Deliver these giveaways instantly to students as soon as they sign up.
Step 3. Plan Your Course Content
A well-structured course is key to student success. Follow these steps:
A. Create a detailed course outline: Break your course into modules and lessons. Draft a comprehensive outline that includes all the major topics and subtopics you want to cover. This serves as the roadmap for your course development.
B. Set clear learning objectives: What should students be able to do after completing your course? Set clear learning objectives for each module or lesson. These should be specific, measurable, and aligned with your audience’s goals.
C. Arrange your content logically: Ensure each lesson flows naturally into the next. Organize your content into logical modules and lessons. Each section should build on the previous one, creating a coherent learning experience.
Step 4. Pick Your Online Course Platform
Picking the right platform is crucial for your course’s success. Here’s what to think about:
A. Popular Platforms: Look at options like CourseFunnels, Thinkific, and Udemy. These platforms offer various tools for creating and managing your course.
B. Self-Hosting vs. Established Platforms: Self-hosting gives you more control but needs more technical skills and an initial investment. Established platforms are easier to use and come with built-in audiences, but have fees and less flexibility.
C. Things to Consider: When choosing a platform, think about ease of use, customization options, features, cost, and support.
CourseFunnels is a great option for creating and managing courses. It helps you build high-quality courses and training with a professional customer experience. It’s designed to support you effectively throughout the process.
Step 5. Build Your Course Content
This step is dedicated to creating your course materials:
A. Write your module or lesson plans: Plan out what each video or lesson will cover. Create detailed scripts or lesson plans for each section to make sure you include all important information and keep the same format.
B. Assignments: Include downloadable PDFs or online quizzes to help students absorb information. Start lessons with a discussion, provide examples, and end with an assignment.
C. Course Certificates: Boost engagement by offering certificates or badges. Automatically email custom certificates upon course completion or award badges for specific achievements.
Keep these tips in mind, and your course will undoubtedly succeed. CourseFunnels is a useful tool that includes course completion certificate generation upon student completion and supports video courses on any platform, providing additional support.
Step 6. Build Your Online Course Website
Your course website is your online shop, so make it stand out:
A. Design a captivating landing page: Make your landing page visually appealing and easy to navigate, showcasing the benefits of your course with clear calls to action.
B. Write engaging course descriptions: Clearly explain what learners will gain from your course and why it’s worth their time.
C. Ensure a user-friendly structure: Organize your website so it’s simple to navigate, allowing students to easily find course materials and track their progress.
With CourseFunnels, you can easily build impressive landing and sales pages for your courses. It also allows you to create complete sales funnels, including upsells and downsells, to maximize your revenue.
Step 7. Establish a price and goals
Like any business, setting pricing and sales goals for your online course is key. When pricing your course, consider these points:
A. Target Audience: Think about what your audience is willing to pay for this type of course.
B. Competition: Look at similar courses in the market and compare their prices. You don’t want to price too high compared to others with similar content.
C. Value Offered: Price your course based on the value you provide. If your course offers detailed knowledge and helpful resources, a higher price can be justified.
D. Revenue Goals: Set a revenue target and create a pricing strategy that helps you meet it.
Smart pricing will help you earn a good profit. CourseFunnels supports all major payment systems and even offers free plugins to boost your sales.
Step 8. Go live with Your Course on the internet
A successful launch can greatly boost your course’s success and attract potential students. Planning a successful launch can be done as follows:
A. Plan Your Pre-Launch: Create excitement by sharing sneak peeks and behind-the-scenes updates. Offer early access to a few people to build buzz.
B. Build Your Email List: You can gather email addresses with lead magnets and newsletters to keep potential students interested and informed about new courses.
C. Use Social Media: By promoting your course on social media to reach your audience, engage with them, and drive organic traffic to your course website.
Now that you’re ready, and if you need help, CourseFunnels can help you out. It automates course notifications and supports email marketing.
Step 9. Promote Your Online Course
At this stage, to successfully market your online course, you need effective strategies to turn visitors into students. Observe the following important advice:
A. Content Marketing Strategies: Create blog posts, podcasts, and videos related to your course topic to drive organic traffic to your course page.
B. Paid Advertising Options: Use Facebook ads, Google ads, or LinkedIn ads to reach a wider audience. If properly targeted, paid advertisements can be very effective.
C. Affiliate marketing and partnerships: Partner with influencers, bloggers, or other educators to promote your course. Offering affiliate commissions can incentivize others to help market your course.
Step 10. Collect and Use Feedback
This stage is somewhat crucial since long-term success depends on continuous improvement, so:
A. Collect Student Feedback: Using surveys, feedback forms, and reviews to learn about your students’ experiences and gather their opinions.
B. Track completion rates: You need to keep monitoring how many students finish your course and look for any trends or issues that might need fixing and by working on them, you can create great results in the future.
C. Make ongoing improvements: By using the feedback and completion data to regularly update and enhance your course content and delivery.
Working on these aspects will enhance your online course creation guide process. CourseFunnels offers built-in features like comments, reviews, and questions for rich interaction, and it’s user-friendly, too.
Step 11. Scale Your Online Course Business
Once you’ve got one successful course, it’s time to grow. Scaling your online course business can lead to increased revenue, a broader impact, and a stronger brand presence. Here are strategies to take your course business to the next level:
Once you’ve got one successful course, it’s time to grow. Scaling your online course business can lead to increased revenue, a broader impact, and a stronger brand presence. Here are strategies to take your course business to the next level:
A. Create additional courses: Expand your offerings by developing additional courses that build on your existing content or explore new topics.
B. Building a Community: Foster a community through forums, social media groups, or live events to enhance student engagement and support.
C. Exploring Other Revenue Streams: Consider adding coaching, consulting, or other services to diversify your income and add value to your students.
Now, if you’re looking for the right support, CourseFunnels could be the solution. It allows you to create multiple courses and memberships, all hosted on a single domain or subdomain.
Step 12. Establish a Community of Learning
Learning online can feel lonely, so creating a supportive community around your course can greatly improve your students’ experience and boost your course’s success. An active community helps learners connect, share knowledge, and stay engaged.
Some ways to create a learning community:
A. Members Area: Set up a special section on your site where users can access exclusive content, chat, participate in forums, and more.
B. Online Forum: Add a forum to your website where learners can help each other and grow together.
C. Social Media Groups: Create private groups on platforms like Facebook or Wix Groups to keep learners engaged.
D. Communication Platforms: Use Slack or Discord to foster ongoing interaction and collaboration.
Avoid these common mistakes when developing a course
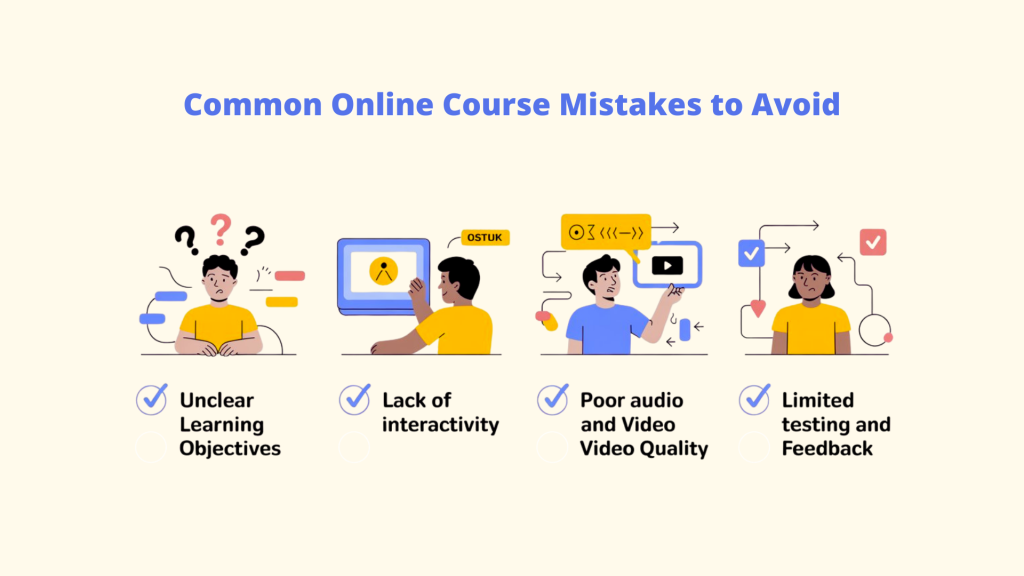
Online course creation has its advantages, but some mistakes can make it less successful. You should be mindful of the following typical pitfalls:
🎯 Unclear Learning Objectives
Clearly outline what learners will achieve by the end of the course. Without well-defined objectives, students may lose focus and struggle to see the value of the course.
🎯Lack of Interactivity
Ensure your course remains engaging by incorporating interactive elements like quizzes, discussions, and activities. These features help learners stay involved and apply what they’ve learned.
You can use CourseFunnels to create rich courses with videos, quizzes, assignments, PDFs, slides, documents, and other media assets.
🎯Poor Audio and Video Quality
Good quality audio and video are essential. Ensure your audio is clear and your video is well-lit and easy to follow.
🎯Limited Testing and Feedback
Regular assessments help track learners’ progress and highlight areas for improvement. Include quizzes, assignments, and opportunities for feedback to keep learners on the right track. For assistance, CourseFunnels provides sales and lead analytics to help you monitor student progress and sales growth effectively.
Conclusion
Since you have reached the end of the blog, you already know that developing an online course combines passion, creativity, and dedication in an exciting and fulfilling process. By walking through this guide, you’re setting yourself up to share your knowledge with an audience and build a successful online education business.
To achieve success, focus on delivering real value to your students. With top-notch content, smart marketing, and a commitment to ongoing improvement, CourseFunnels can be your key partner.
This platform not only helps you create engaging courses but also supports effective sales with its suite of six profit-boosting plugins.
Embrace the potential of your online course journey and let CourseFunnels guide you in making it a success.
Are you ready to turn your expertise into an impactful course? The world is eager to learn from you. Start sharing your knowledge today!